Guest Post: Using Windows PowerShell to facilitate PBCore DescriptionDocument completion
This post, written by Kelsey Beauvais at the Canadian War Museum, provides a case study for the use of PBCore tools in a Windows environment.
I am by no-means an information technology professional, but I do work with tons and tons of information! I’m guessing that you do too, or else you wouldn’t be here reading this post.
We are in a digital world and while it is no longer shocking to receive large donations of digital material, it is still challenging. It sometimes feels like we are in a holding pattern, where our processes and ways of working no longer fit the material we have. Because there are no one size fits all solutions or ways forward, we try to figure out what’s possible with the information, resources and tools we have available. Luckily, one of the best ways to learn in this type of environment is to experiment and share our trials and tribulations with others.
Faced with digital records and large volumes of data, many earlier processes are also no longer sustainable. This, in turn, is driving a need for information professionals, including archivists, to further our knowledge of programming languages and new IT skills to incorporate into our day-to-day workflows.
I am currently working as the Oral History Collections Specialist at the Canadian War Museum. I am part of the In Their Own Voices (ITOV) oral history project. The ITOV project aims to capture new first-hand accounts of veterans and their families on post-service experiences from those who served in the Second World War all the way up to the present. A project like this is a huge undertaking. We are concurrently producing, archiving, and cataloguing the born-digital interviews on an ongoing basis.
I work with the project historian, Dr. Michael Petrou, in the production of the interviews and transcriptions. Once produced, I’m also responsible for all archival processing related to the interviews. This includes prepping the born-digital material for preservation, describing, and cataloguing the material in the Museum’s collections management system and making the catalogue records accessible online.
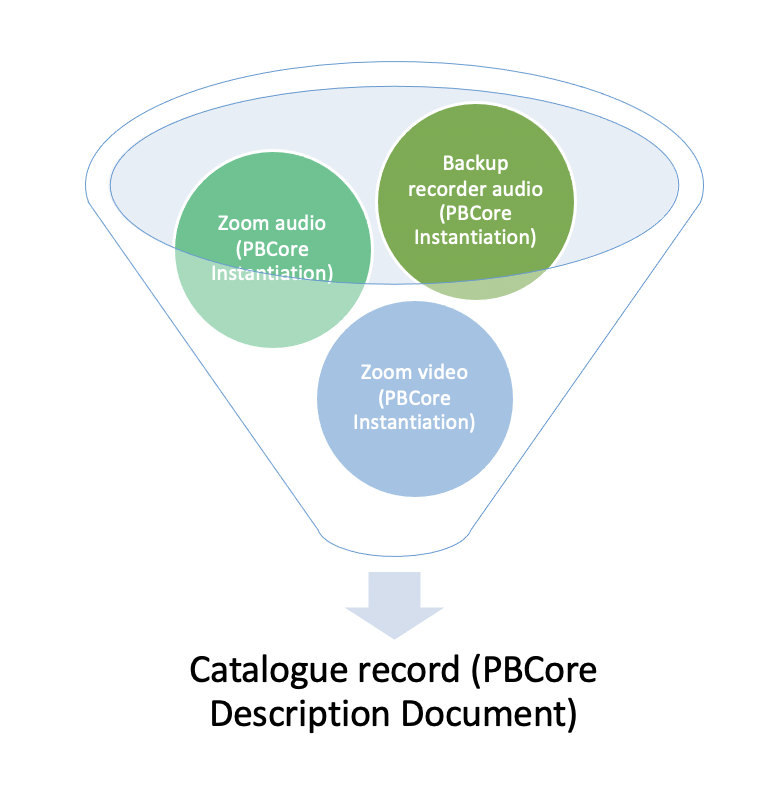
In the context of the project, we are producing hundreds of interviews over the next few years. We are also working remotely, at least for now, which adds another layer of complexity. Sometimes we’ll do a video interview via a web-based platform such as Zoom which outputs 2 files: a MP4 (audiovisual) and a M4A (audio). As a backup because technology is often unreliable, we also capture the audio of the interview on an external recorder. It may seem like overkill, but these are interviews and are often conducted with elderly individuals. Let me tell you that the backup has already come in handy because of dropped calls, bad internet connections, and unreliable technology. As you can imagine, this quickly adds up. Each interview will likely have 1 to 3 ‘versions’ – all of which we are keeping. In addition to safeguarding the magic of an interview, it’s also beneficial to have multiple versions so the Museum can use appropriate copies in museum activities (e.g., educational programming, research, exhibitions, etc.).
So here I am with tons of interviews that need to be ingested so that I can initiate the project’s archival processing. The Museum has been capturing digital archival material metadata in PBCore. Protocol is to capture and build the information as PBCore DescriptionDocuments – a clear, efficient, and an accepted standard across the archival community. For PBCore users, MediaInfo is a great free open-source software tool that can create and export video and audio record metadata into a PBCore schema. That being said, if you are familiar with MediaInfo you’ll know that it only exports in PBCore InstantiationDocuments which brings me to:
The challenge: I needed to use MediaInfo to efficiently extract each version of the interview’s technical metadata into a PBCore schema. Mediainfo outputs one XML PBCore InstantiationDocument for each version but I would need to create one PBCore DescriptionDocument XML with various instantiations to account for the various versions and to follow the Museum’s standards. After some research online, I couldn’t see a way to do this other than manually editing, cutting, and pasting information together. And again, we’re talking about hundreds of interviews, multiplied by multiple versions…
I’ve been dabbling in bash scripts and PowerShell commands for a little while now. Their functionalities and large-scale use have saved me loads of time by automating tasks. My knowledge of how to build either from scratch is, however, limited. I started with a good ol’ Google search to see what I could find online.
We work with a Windows Operating System (OS). This is not uncommon in the PC world. Most government agencies, even most workplaces in general (except maybe those who work in information technology) use this OS. The trouble was that most online advice I found was “here’s the script you need for Linux OS” or “download a sort of emulation of another OS such as Linux and use that to do your script”. I understand that Linux tends to be more user friendly for scripting, but this wasn’t helpful to me and I imagined it wasn’t helpful for others in the same circumstance. I am working within the confines of the equipment I have; I needed something to work and quick, and I had it in mind that this approach could be re-used across the Museum, if needed. The quickest way was to create a command that I could execute myself without IT intervention. I was pretty motivated to understand and create something that would save me tons of time – so why give up the chance to learn something?! 😉
I started to build some basic knowledge in Windows PowerShell. What commands were available to me, what did all the acronyms and symbols mean, how to navigate in PowerShell efficiently, how did PowerShell read and understand the commands, etc. It’s like learning a new language – very daunting –particularly when starting off. Building a new script or command can take time, but the tests and time put in now will undoubtedly be useful the next 3000 times I (or other colleagues) need to do this task. Indeed, what I created, though a bit clunky, has been useful.
*Note that in our case interviews are produced on an ongoing basis, which means I am processing them as they are completed. You could, with some adjustments to the setup below, use this command for a mass operation if you have all your material ready for processing.
Setup:
The first two steps in the setup only need to be completed once unless changes are required in your template.
-
Create a PBCore DescriptionDocument template with the PBCore cataloguing tool. When you save your template, it likely won’t be a ‘valid’ PBCore yet because of any unique information you may need to add per DescriptionDocument. In my template, I’ve still included both repeatable fields for the project and empty fields where I’ll want to later input specific information about each interview.
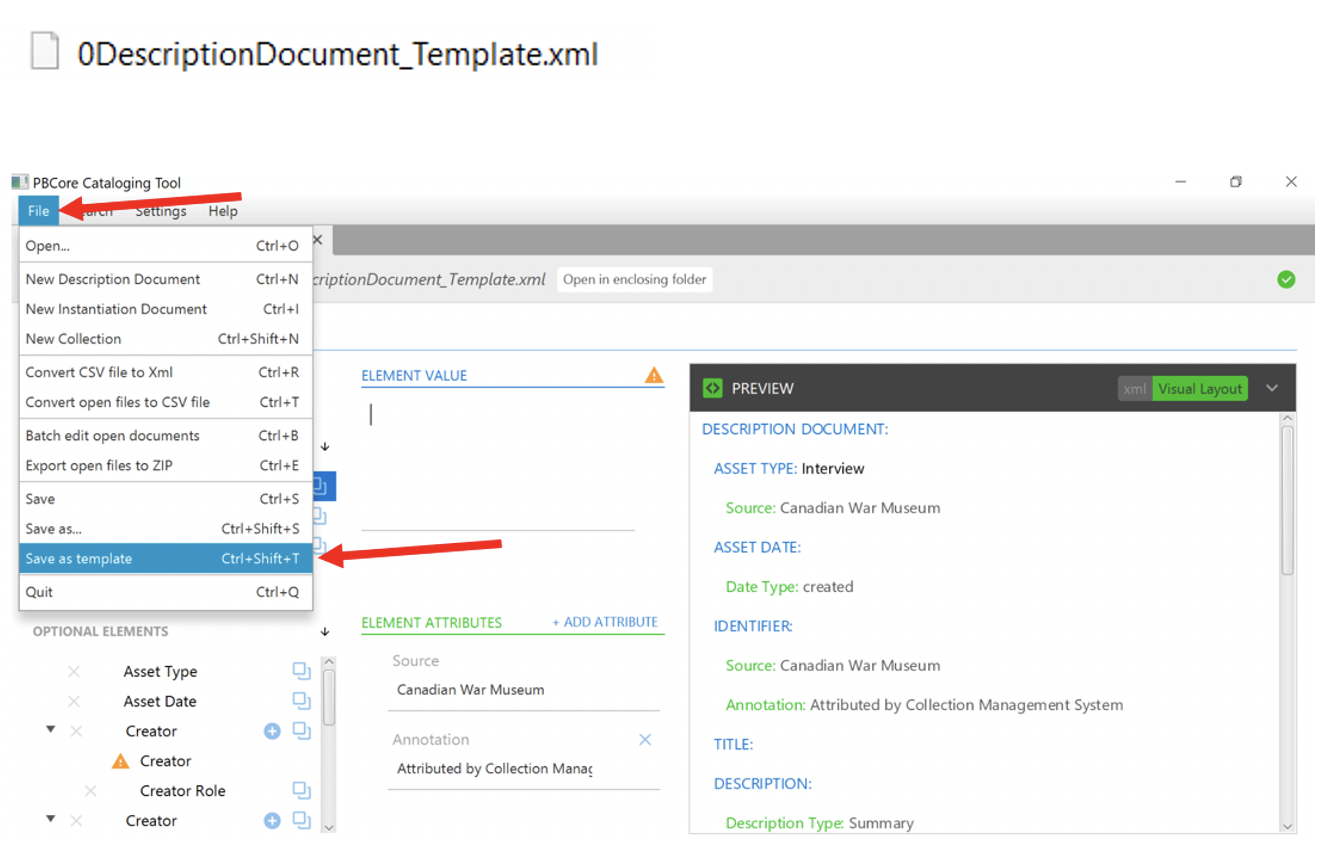
Name your template with a 0 (zero) at the beginning of the filename or something that will ensure the template is the first file in the folder. When the script is run, it must grab the template first in order to correctly merge the content. Ensure to keep a master copy of your template for reuse.
-
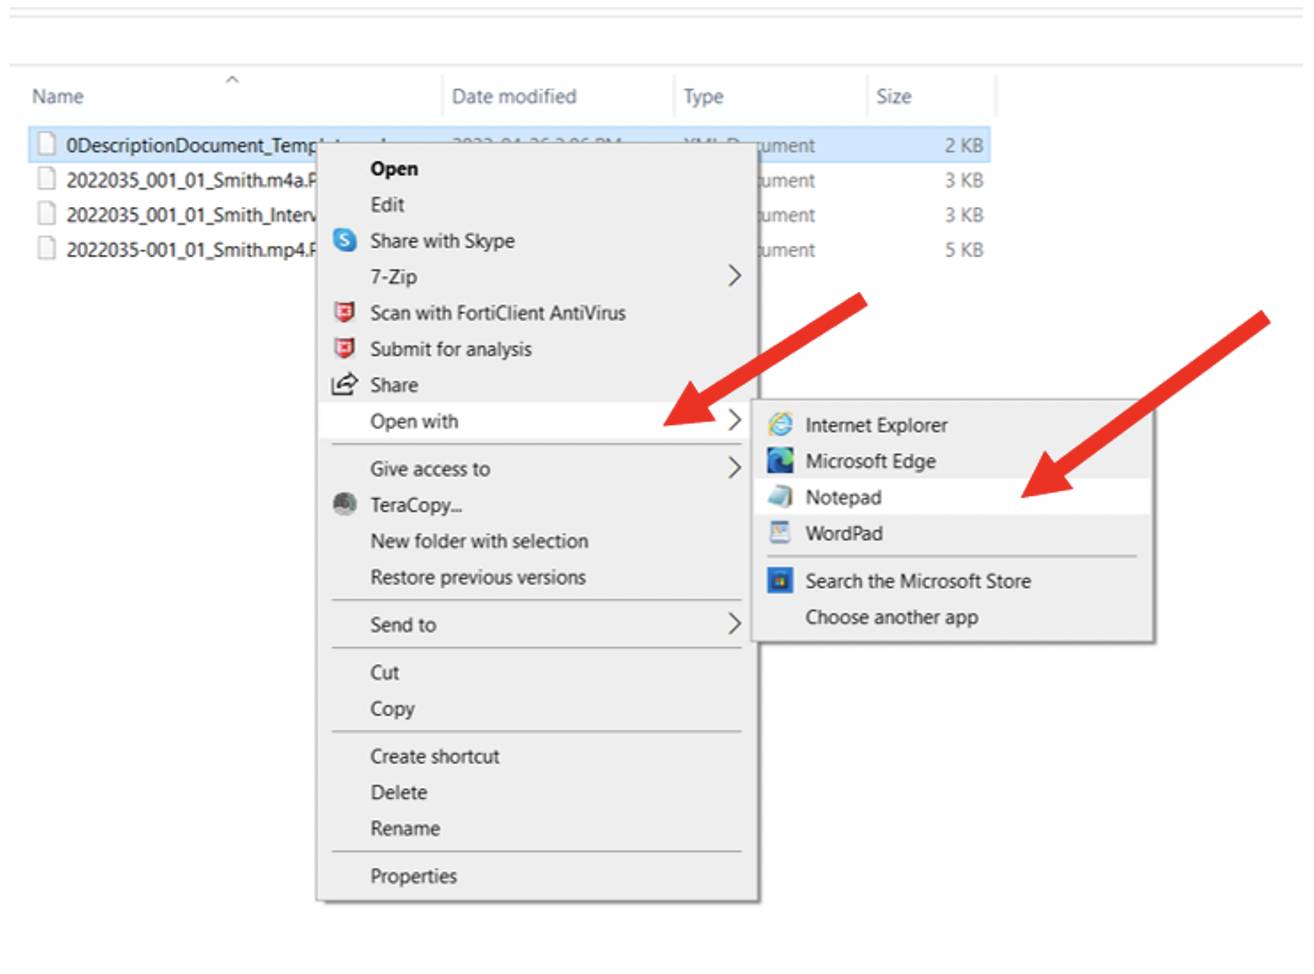
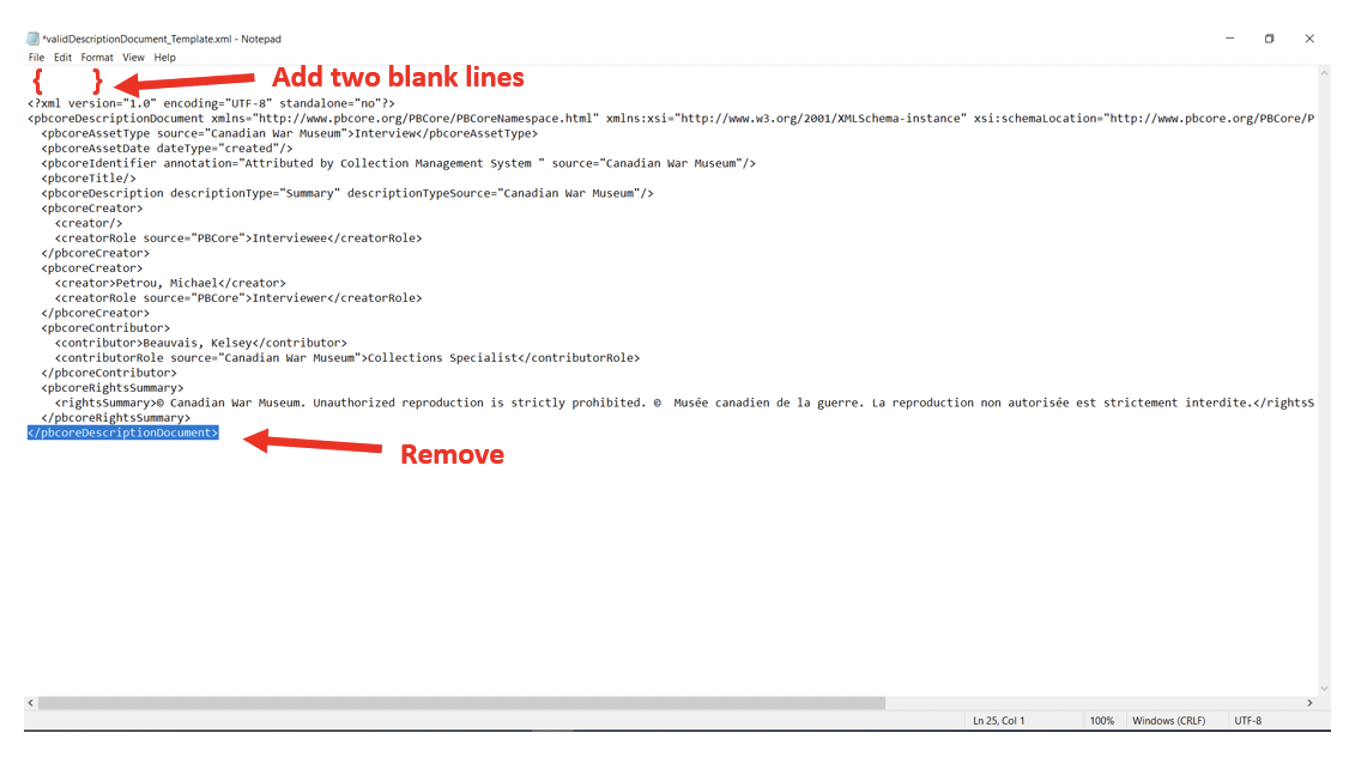
Editing the PBCore DescriptionDocument template – this part is a bit funky but is required because of the way the command works. Edit the PBCore DescriptionDocument template in Notepad and enter two blank rows at the beginning of the document and remove the end element “</pbcoredescriptiondocument>”. Hit save.
-
MediaInfo is pretty easy to use. Drag your audiovisual material into MediaInfo and select PBCore when exporting (see note.) If you want your instantiations to appear in a specific order in your PBCore DescriptionDocument you can add sequential numbers at the beginning of the filename.
Note: While you’ll still have to select the export format you want, you can automate this step in Windows PowerShell (useful for running large quantities through MediaInfo at once), with the following (ensure the quotations are left in):
cd “PASTE YOUR MEDIAINFO.EXE LOCATION HERE”
.\MediaInfo.exe -i “PASTE LOCATION OF YOUR AUDIOVISUAL MATERIAL HERE” -
Save a copy of your PBCore DescriptionDocument template and your PBCore InstantiationDocument output(s) from MediaInfo into one folder. Ensure no other documents reside in the folder. Again ensure you’re using a copy of the template and not the Master copy.
What does the command do?
- It reads through all files in a folder (no matter the file type) then text searches and replaces “PBCore InstantiationDocument” into “PBCore Instantiations”. The command then saves the changes over the existing files.
- It removes the two first lines of all files in a folder in order to remove unnecessary information for PBCore Instantiations.
- Consequently, it removes the two first lines in the PBCore DescriptionDocument template, hence the addition of the two blank lines in the setup.
- It then merges all the content from each file in the folder, orders the content according to their filename, and then saves it in a new XML.
- Lastly, it adds the closing element of a PBCore DescriptionDocument to the end of the new document.
PowerShell Command:
-
Open Windows PowerShell and paste the following command:
$directory_path = “PASTE XML LOCATION HERE”
$files = Get-ChildItem $directory_path
foreach ($file in $files){
((Get-Content $directory_path$file) -replace ‘',' ') | Set-Content $directory_path\$file ') |Set-Content $directory_path\$file
(Get-Content $directory_path\$file) -replace '</pbcoreInstantiationDocument>','
(Get-Content $directory_path\$file | Select-Object -Skip 2) | Set-Content $directory_path\$file
Add-content -path $directory_path\New.xml -value (Get-Content -path $directory_path\$file)
}
(Add-Content $directory_path\New.xml -value '</pbcoreDescriptionDocument>')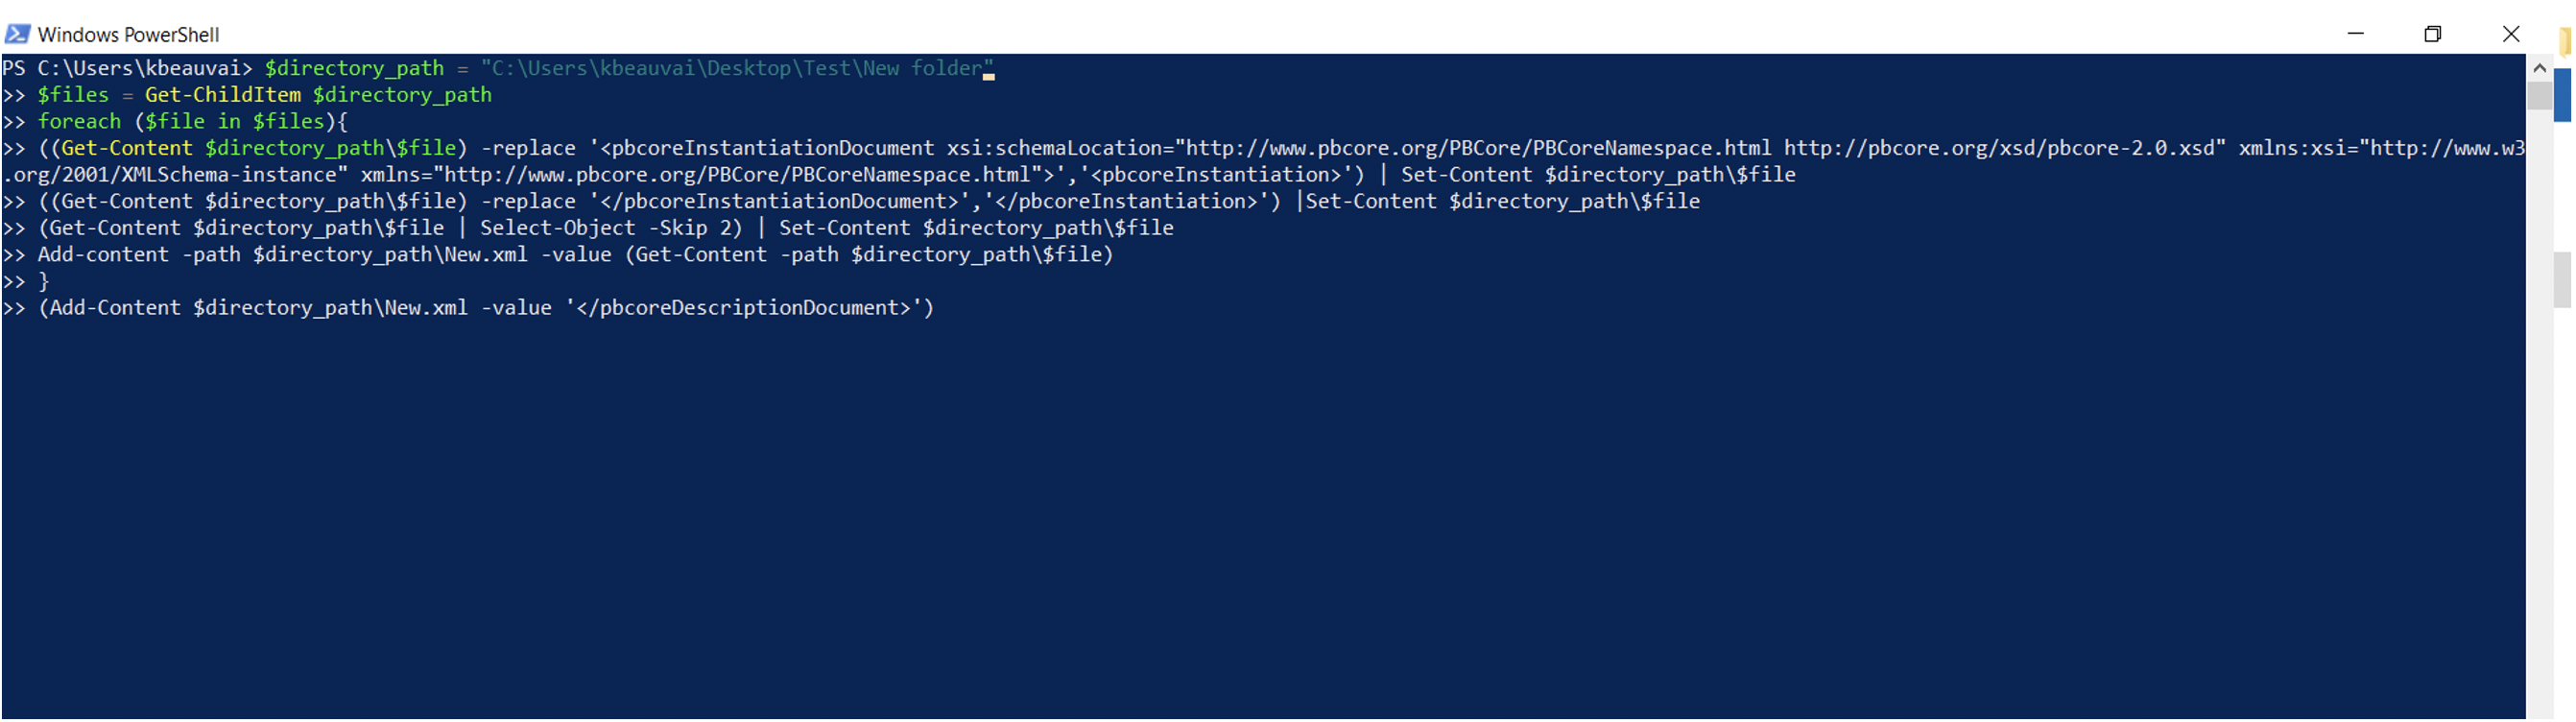
-
Inside the command in PowerShell, replace the text inside the quotations “PASTE XML LOCATION HERE” with the filepath of the folder containing the copy of the PBCore DescriptionDocument template and the PBCore InstantiationDocument output(s) from MediaInfo (If you’re unfamiliar with PowerShell, you can’t click and edit, you need to navigate to the area you want to edit using the arrow keys).
-
Hit Enter and the command will run. A new document “New.xml” should have appeared in the folder. The PBCore DescriptionDocument template and the PBCore InstantiationDocument outputs from MediaInfo will have undergone edits too. If you want the original MediaInfo outputs to stay static, you should use copies with the command.
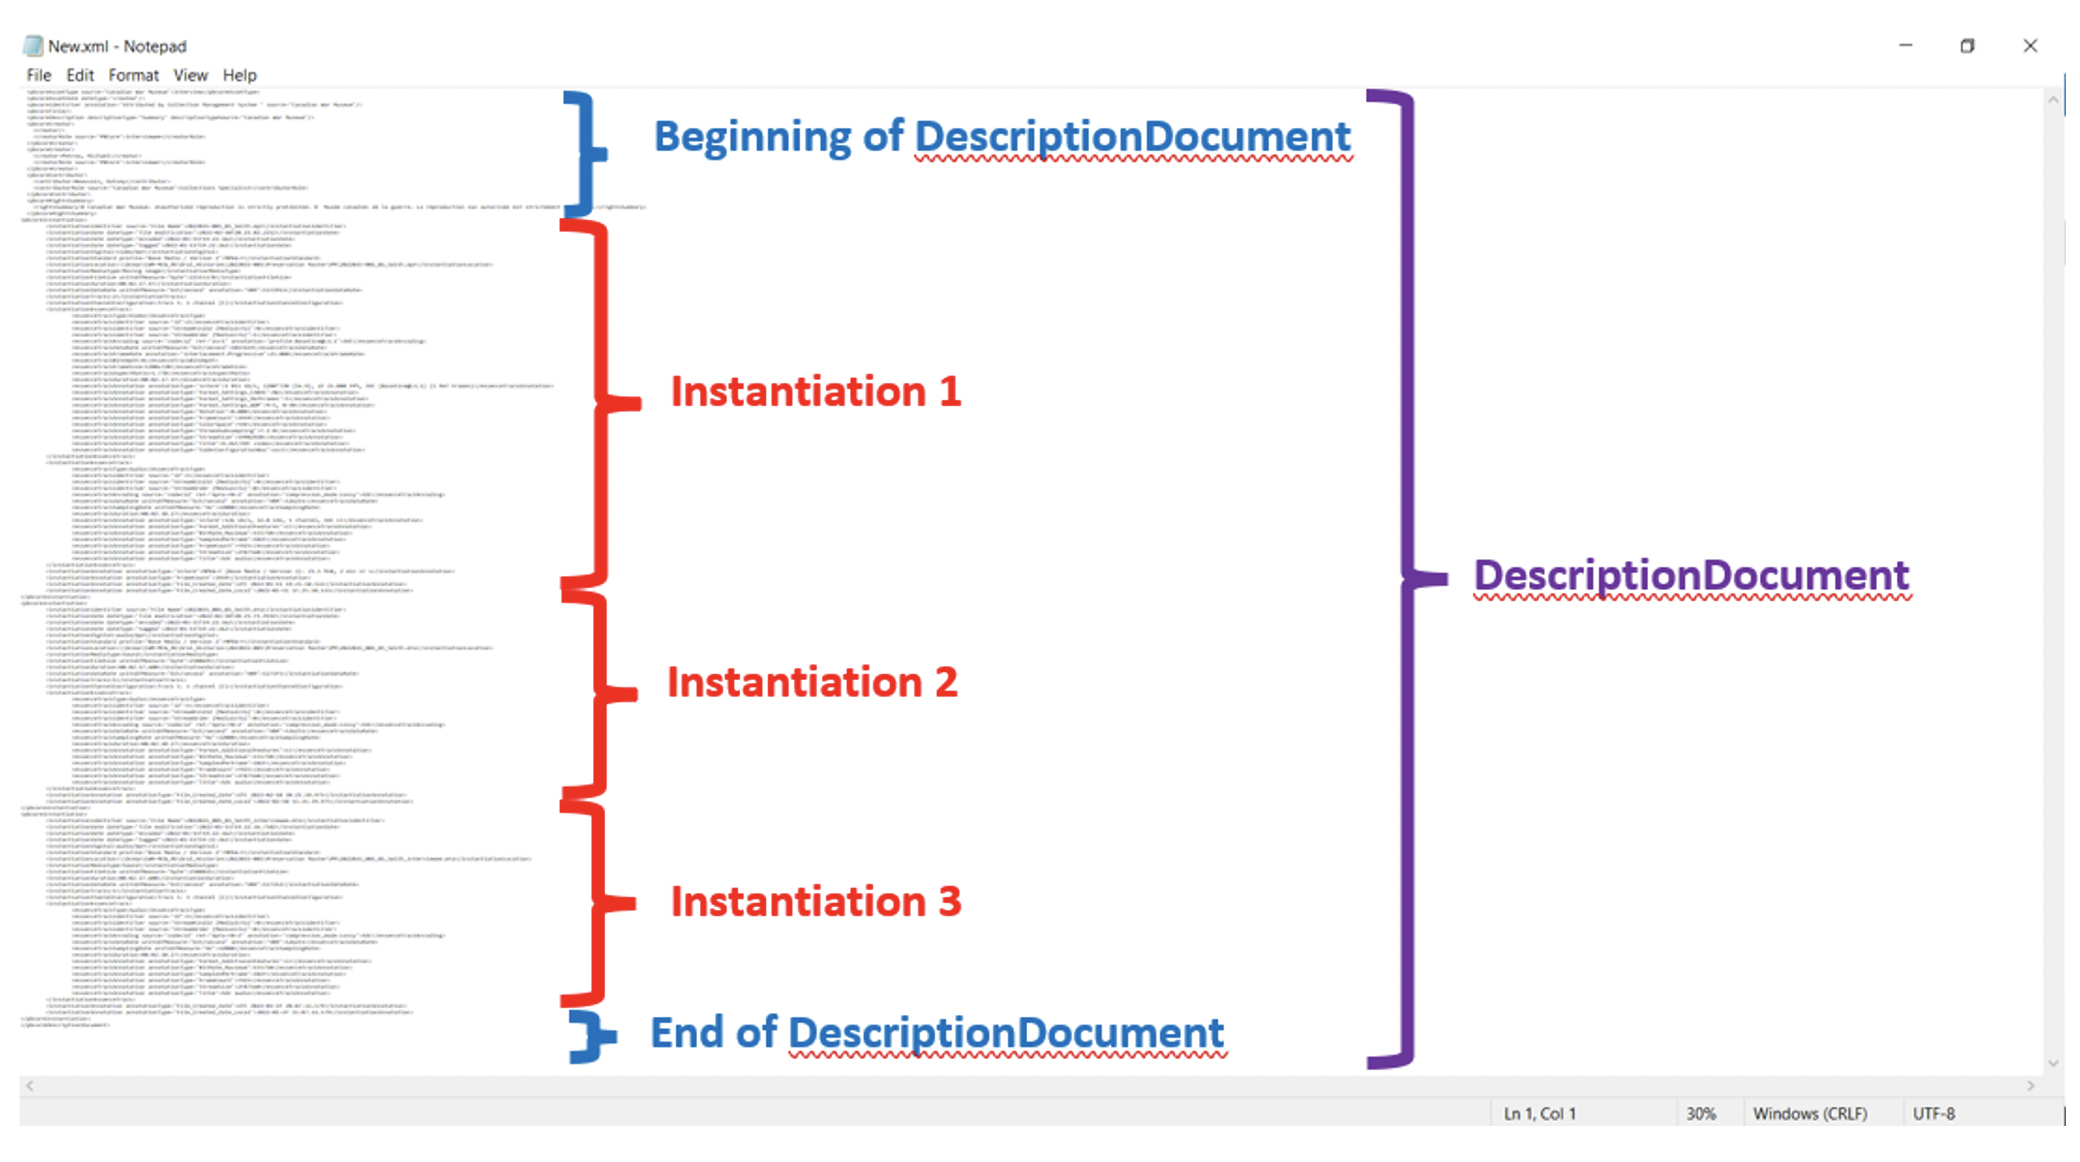
That’s it! Keep in mind that the new document won’t be a valid PBCore DescriptionDocument until you add values into the mandatory fields (if you weren’t able to do so in your template already). I rename the new xml to follow our specific naming convention for each interview and then I run it through the PBCore cataloguing tool to complete the mandatory fields and fine tune a few other specifics.
This command works for my purposes right now. Could it be smoother? Probably… And I’m sure I will tweak it in the future. In fact, I’m hoping to turn it into a .PS1 script soon, but it already saves me a lot of time in my archival processing.
I thought I would humbly share what I have so that it might help someone using Windows OS in some way. Maybe you can use it for your work outright, maybe you can use it to experiment for something greater and more useful, or maybe this will motivate you to share or suggest your vastly more efficient ways of working. (Please do!)
I’ve also found that what I’ve learned along the way benefits and will facilitate the processing of digitized material. It has helped me better understand the technology at my disposal and how to move forward in my work.
Special thanks to my partner who very helpfully reviewed and tested the script with me!